Showing posts with label Business. Show all posts

Saturday, 29 August 2020

Fertilizer Production Line Configurations

The new fertilizer production line project should comprehensively consider local resources, market capacity and market coverage radius. In general, the annual output of small new plants is 10000 tons (1.5 tons / hour), 20000 tons (3 tons / hour) and 30000 tons (4.5 tons / hour). The annual output of medium-sized factories is 50000-100000 tons, and that of large-scale factories is 100000-300000 tons.
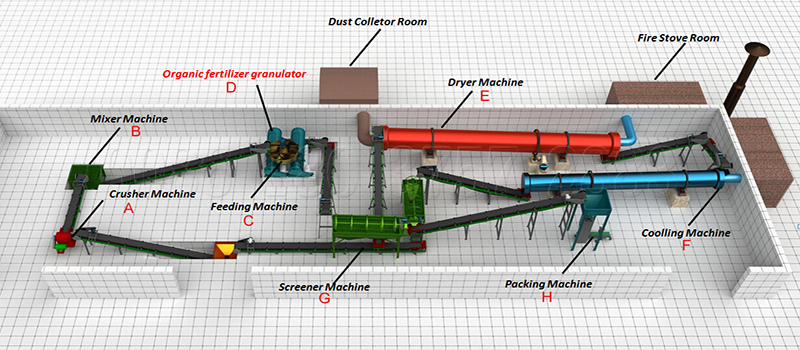
The investment scale and scheme design should be made according to the following conditions: raw material resource characteristics, local soil conditions, local planting structure and main crop varieties, plant site selection, NPK fertilizer granulator selection, production automation degree, etc.

Fertilizer production line

Several equipments of chemical fertilizer production line

1. Mixer. In addition to chemical fertilizer raw materials, some cohesive materials, such as clay, can be properly added in the mixing process. During operation, the material is evenly mixed by stirring back and forth with multi-channel rotating blades.

2. Fertilizer granulator. Organic fertilizer granulator is generally used in small-scale production to meet the requirements.

3. The rotary dryer is mainly composed of drying cylinder, transmission device, support device and cylinder tail sealing parts. The diameter ranges from 80 cm to 3 m and the length depends on the drying requirements. The dryer is a cylinder inclined to a certain angle in the horizontal direction. The material is added from the high end, and the high temperature flue gas and the material enter the cylinder in parallel. As the cylinder rotates, the material moves to the lower end due to gravity. The lifting plate is welded on the inner wall of the cylinder to absorb and drop materials, and fully contact with hot air in the falling process to achieve the purpose of drying.

4. The rotary cooler can reduce the moisture content when cooling a certain temperature. It is the same as the dryer equipment, but uses space-time gas to pump from the head to the outside, so there is no need to seal the tail.

5. Combined screen is adopted for drum screen, which is convenient for maintenance and replacement. This machine has the advantages of simple structure, convenient operation and stable operation.

Tuesday, 4 August 2020

Pan Pelletizer Working Principle

The main structure of disc granulator is disc. The disc designed by ShunXin fertilizer granulation plant is thicker, heavier and stronger, and the base design does not need to be fixed with anchor bolts, so the operation is stable. The granulation plate of pan granulator has three sockets, which is convenient for intermittent production and operation, greatly reduces the labor intensity and improves the labor efficiency. The reducer and motor are driven by flexible belt, which can start stably, reduce the impact force and improve the service life of the equipment.
The main motor drives the pulley and belt and drives the pinion through the reducer. The big gears fixed at the bottom of the disc mesh with each other and work in the opposite direction. The large gear is specially designed for mounting on the spindle of the housing adjusting disc to support the work of the whole granulator (in conjunction with the sprayer).

We have designed an automatic cleaning device on the top of the pan to prevent the material from sticking to the wall, thus greatly improving the service life of the pan granulator. With the continuous rotation of the motor and the continuous entry of materials, mass production can be realized.

The disc surface of the disc granulator should be flat and the disc roundness should be high. On the one hand, the CD theme affects the overall beauty of the device, on the other hand, it is also the most important. Only when the roundness and flatness meet the requirements, the equipment can run well, the bottom scraper and side scraper can play a role, fully contact the disc surface and bottom, scrape off the materials attached to the disk surface and bottom, and further form a spherical shape.

Thursday, 2 April 2020

Vermincompost Production Business

As human populations grow larger, agricultural endeavors also enhance their supplies and demands in addition to considerable waste elements. The biological wastes collected from human and agricultural activities might be transformed into a vital solution to tired nutrient drained farmlands –– and with the help of the common earthworm (Eisenia foetida) and (Lumbricus rubellis).
Vermi, or worms, does apply to turning common putrid biological waste in to a valuable form of compost called “vermicompost”. As the worms feed and digest the biological materials they turn them straight into a very beneficial product utilized to complete the supply and demand chain.
Vermicomposting converts biological waste into healthy compost in the mere 4 to 6 weeks, whereas traditional composting will take from 8 to 12 weeks. As earthworm populations increase, they can also be sold as feed for aquaculture and poultry. Furthermore, the supplies found it necessary to begin such an endeavor are relatively small and medium-sized commercial vermicompost operation might be started having a relatively small investment.

Step 1: Creating
Along with a suitable space to set up your worm beds, your will need a variety of gardening tools, work gloves plus a heavy duty shredder or chipper for breaking down tough biological materials into easily digestible pieces.
Furthermore, you will want the guest of honor. You can buy the earthworms that you pick from a variety of online sources or even better, look into other vermicompost projects in your area to see what they must say concerning the best local worms. Finally, be sure you have got a sustainable method to obtain biological waste –– or you will be mowing lawns simply to feed your worms.
Step Two: More Preparations
Throw everything in the shredder and mix the shredded bio wastes with many old manure and chicken droppings to get started. Make sure this really is more than 2 months old, fresh manure has a high ammonia content which can upset the worm’s gastrointestinal tract. Spread this under the sun, letting it dry and ferment for a few days.
Once dried, you must weigh materials to view simply how much compostable you might be actually dealing with.
Step Three: Permit the Composting begin –– but no Worms Yet!
After you have weighed the biomass, you could start composting. First anaerobically, or without oxygen. Spray the vermicompost down with water, before covering it with old sacks, plastic sheets or tarpaulins depending on the things you have readily available. This procedure is going to be completed within two week, maybe less.
Step 4: Enter into the Worms
Since the beds and breeding grounds for our guest of honor are already properly prepared, we can introduce the earthworms to their vermi-beds. You need to protect your earthworms from birds and then any other local predators. Maintain a steady temperature and humidity in the beds to help keep the party going strong and the worms gorging well. This entire stage of the process will probably be carried out in about 30 to 45 days.
Step 5: Collect and Store
Sift the vermicompost before packing the sifted castings into sacks and storing within a cool dry area. The removed worms can be separated for usage within the next batch of vermicompost and additional worms might be sold to poultry farms and fish farms for feeding purposes.